Make sure you’ve glanced over Part 1 to make sure this process is right for you.
Setting up your POP3 accounts into Outlook is a fairly simple process. However, in order to do this, you need to have the following information from your POP3 email account provider:
- The Incoming Mail Server (POP3);
- The Outgoing Mail Server (SMTP);
- The Server Port Number (if it requires something other than the default).
Please note that each email provider can have different and specific information for each of these areas and you may need to visit their site or call them to get this information.
You’ll also need your mail username (typically your actual email address) and password, which you set when you created the account.
Note: Download the latest updates for Outlook from Microsoft. This will help prevent the most common Outlook errors users see.
Keep in mind that there is a lot of text below (and pictures so you know you’re on the right track), but it is a pretty simple process and once you’ve done it, all remaining accounts you need to add will just fly by! Don’t hesitate to contact me if you have problems.
The Outlook Dialog
- From within Outlook, click Tools>E-mail Accounts
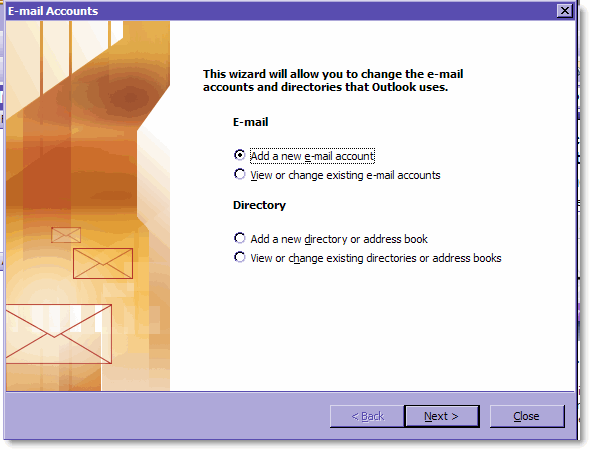
- From the E-mail Accounts dialog, click E-Mail>Add a new e-mail account, then Next .

Click for larger image
- From the Server Type dialog, click POP3, then Next
 >
>
Click for larger image
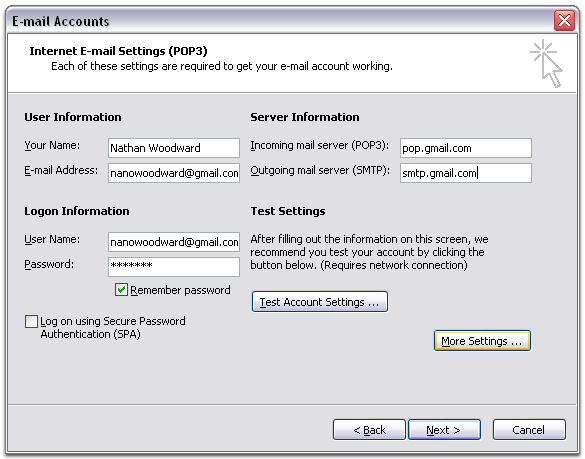
- From within the E-mail Settings (POP3) dialog, enter the following:
- User Information
Your Name: Enter your name as you would like it to appear in the From: field of outgoing messages.
Email Address: Enter your full email address (username@gmail.com)
-
- Server Information
- Login Information
Incoming mail server (POP3): pop.[your domain].com (usually this but not always. Godaddy uses pop.secureserver.net for all incoming accounts.
Outgoing mail server (SMTP): smtp.[your domain].com (usually this but not always. Godaddy uses smtpout.secureserver.net for all outgoing accounts.
User Name: Enter your username (typically your full email name you@yourdomain.com)
Password: Enter your password
- Click More Settings…
-
- From the General Tab, add the account name, as you want it displayed within Outlook.
- I always add the Organization name. I also add the Reply E-mail address, but take care to add it here correctly or else all reply emails will not get back to you.
Note: This is just for your own personal use and will only display on your internal email account list. This is helpful if you have multiple email accounts in Outlook and helps distinguish them from one another, say, gmail from hotmail from msn from your own domain. As a naming convention process, I add the username only with a hyphen and the account, e.g., debbie-dshsolutions, that way if I have a multiple accounts with the same domain, I can see at a glance which account I want to use to respond with or start with.
Note: This can be a powerful feature if you are switching from one account to another or want to direct your clients from your personal account to your business account (or vice-versa). When you add a different reply email account, when your recipient replies to your email it will not go to the sending account, it will go to the account you designate in this field.
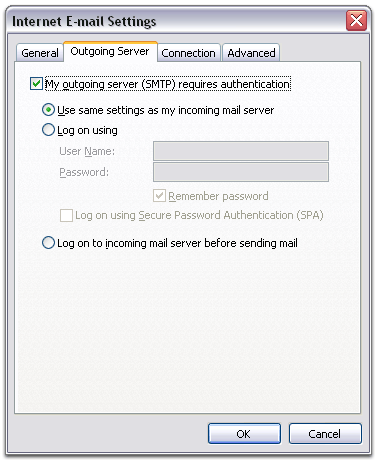
- Click the Outgoing Server Tab
- Click the Advanced Tab
- Make sure that Leave a copy of messages on the server is left unchecked unless you plan to do duplicative work organizing and deleting your emails – both on your webmail server and also within your Outlook. I don’t recommend having this setting turned on unless you have a very specific need.
- Don’t change the POP3 server or SMTP server ports unless your provider specifically requires it.
- Click OK.
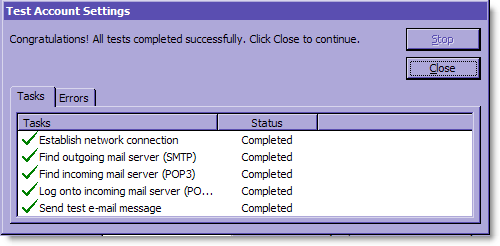
- Click Test Account Settings... After receiving Congratulations! All tests completed successfully, click Close.
 >
>
Click for larger image
- Click Next, and then click Finish.
Note: Download the latest updates for Outlook from Microsoft. This will help prevent the most common Outlook errors users see.
